Creating a Double Braid Eye Splice
Mastering the Double Braid Eye Splice: Key Splicing Rules & Best Practices
- Class I Ropes Only: This guide is exclusively for Class I double braid lines (made of traditional fibers like polyester, nylon, or olefin) where both the core and cover share the load equally. It should not be used for Class II high-tech lines like Dyneema®.
- Strength Retention: A properly completed double braid eye splice preserves 90–95% of the rope's original strength, whereas standard knots significantly weaken the line.
- Essential Crossovers: The splicing process involves extracting the braided core, tapering the cover tail, routing the cover into the core, and then burying the core back inside the cover to establish a tight crossover.
- Lock Stitching Recommendation: Lock stitching the finished eye splice with a sailmaker’s needle and whipping twine on two perpendicular planes prevents the splice from opening under zero-load or no-load conditions.
- Thimble Usage: When attaching a metal shackle, a rope thimble must be used within the eye loop to protect against point-load friction and prevent the line from breaking over time.
- Consistent Tapering: Uniformly reducing the diameter of both the core and cover tails ensures smooth visual transitions and effortless passage through blocks and jib car leads.
If you're looking for information on how to create an eye splice with double braid rope – you've come to the right place! An eye splice is used to add a permanent loop at the end of a double braid rope, such as for a halyard or a dock line of a specific length. They can also be used to form rope around a thimble, which protects the rope when it's being used in conjunction with something that might chafe, such as wire rope or a shackle.
With braided rope, it's very important to differentiate between “Class I” and “Class II” lines. Class I lines incorporate a braided core within a braided cover – with both the core and cover carrying an equal amount of the load – and Class I is what we will discuss splicing in this article.
Class I lines are typically constructed from traditional fibers such as olefin, polyester, and nylon. This splice differs significantly from splicing with a Class II line, so it's essential to consult the manufacturer if you're unsure about the type of line you have. This guide is ONLY for Class I eye splicing. We also have articles on creating an eye splice with 3-strand line or a rope-to-chain splice if you're interested.
Preparation
When it comes to splicing, having the right tools is essential for achieving a strong and reliable result. Before you start, gather everything you will need – including a splicing fid, a marlinspike, tape, scissors or a sharp knife , a Sharpie marker, whipping twine, some sort of lighter or torch (such as the Ancor Mini Pocket Torch ) along with the Class I line you want to splice. If you plan to add a thimble, make sure it's handy too.
Ready….Set….Splice!
-
Prepare the Rope: Tape the end of your rope with a thin layer of tape, then from the end of your rope, measure back 1 tubular fid length (or 2 wire fid lengths) and mark as Point R, for “reference” (figure 1).
-
Form the Eye: From Point R form a loop the size of your desired eye and mark the end of that loop as Mark X. This point is where you will extract the core from inside the cover. If adding a thimble, make sure the loop is just long enough to wrap tightly around the thimble and mark accordingly.
-
Tie a Knot: Approximately 5 fid lengths from Mark X, tie a slip knot about 15 feet from the end of the line. This helps keep the core and cover secure while you are completing the splice (figure 1).
-
Prepare the Taper: Take a close look at the cover braid and you will see that half the strands revolve to the right and half to the left. Depending on your line, those strands may be comprised of 1, 2 or 3 individual strands – but count them all as one group strand. Starting at Point R and working toward the end of the cover, count 8 consecutive strands that revolve to the right and mark the 8th strand completely around the cover – this is Mark T. Starting with Mark T, and working towards the end of the cover, mark every 5th left and right strand to the end of the cover (figure 2 below). You will complete this taper in Step 8.
-
Extract the Core: Bend the rope sharply at Mark X and with a pusher or marlin spike spread the cover and expose the core. It's important to be VERY careful to not break, separate or stretch individual cover or core strands during this separation – so be patient! Working your tool under the core (and making sure you have the entire core – not just a piece!) pry, then pull, the core completely out of the cover at Mark X. Tape the end of the core with a thin layer of tape. Holding the exposed core, slide the cover back as far as you can towards your slipknot. Next, holding the slipknot in your hand, slide the cover back towards the end of the core until there is no further slack in the cover. At the point where the core exits the cover (Mark X) mark completely around the cover – this is Mark 1 (figure 3 above).
-
Mark the Core: Slide the cover from Mark X back towards the slip knot. From Mark 1, measure along the core towards Mark X a distance of the short section of your tubular fid and make 2 heavy marks for Mark 2. From Mark 2, measure in the same direction 1 full fid length plus one additional short section and make 3 heavy marks for Mark 3 (figure 4).
-
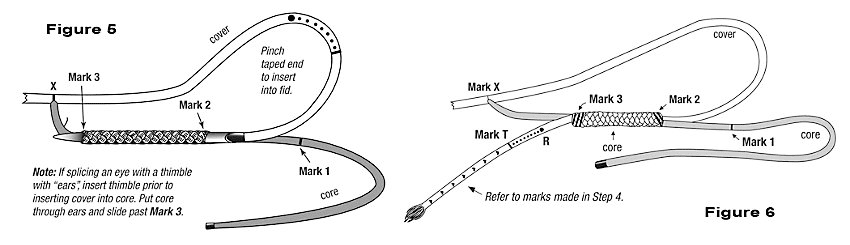
Insert the Cover into the Core: Tape the bitter end of your cover and jam it tightly into the hollow end of the fid. Insert the front of the fid at Mark 2 on the core, pushing it through the middle of the core, exiting at Mark 3 (figure 5 below). The center of the core should be fairly loose and your fid should slide fairly easily through it, being careful not to snag any of the core threads. If the going is tough, you may need to milk the core over the fid while pulling the fid through from Mark 2 to Mark 3. Once through – remove the fid and pull the cover tail through the core until Point R emerges at Mark 3 (figure 6 below). Remove the tape from the end of the cover tail and ensure the end of the cover is properly positioned.
-
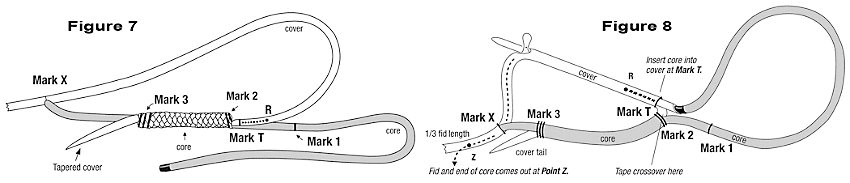
Finish Cover Taper: Return to the cover tail marks made during Step 4. Starting with the marks closest to the end of the cover, pull each marked pair of strands completely out at their mark and trim off until you reach Mark T – do not cut beyond this point. You should now have a gradually tapered cover. Very carefully pull the cover back through the core until Mark T emerges from Mark 2 (figure 7 below). With Mark T and Mark 2 held tightly, smooth the core from Mark 2 toward Mark 3, leaving the tapered cover tail out. Tightly tape Mark T and Mark 2 to secure the crossover.
-
Insert the Core into the Cover: From Mark X on the cover, measure 1/3 tubular fid length toward the slip knot on the rope and mark as Point Z. Jam the taped core tightly into the end of the fid and insert the fid at Mark T. Push the fid and core through the cover tunnel, past Mark X and through the cover at Point Z. Pushing from Mark X to Point Z can be somewhat tight, so take extra care to not snag any internal core strands. Depending on the eye size, the fid may not reach to Point Z. If not, you can exit the cover, pull the core through and then push the fid back into the exact same place you exited to complete the next stretch until you reach Point Z (figure 8 above) to ensure a clean taper.
-
Prepare Core Tail for Tapering: Pull the core tail at Point Z and pull the tapered cover tail at Mark 3 to tighten the crossover until it's approximately equal to the diameter of the rope. Smooth out the cover of the eye completely from crossover Mark T to Point Z to remove all slack from the eye area. At Mark X – mark the core tail and mark it again where it exits at Point Z. Pull on the end of the core tail until the mark you made at Mark X is exposed at Point Z (figure 9).
-
Taper the Core Tail:
Cut the excess core tail off at the mark you originally made exiting Point Z. From here to the mark you originally made at Mark X, mark the core strands for tapering based on core construction:
12-Strand Core (1-5/8” and larger line) – mark every 2nd right and left strand for 3 strands as shown. Pull out and cut off every marked strand (you may need to remove the tape at the end.
8-Strand Core (1-5/8” and smaller line) – mark 4 consecutive strands as shown. Pull out these strands and cut offTapering involves gradually reducing the diameter of the rope at the splice, which not only enhances the aesthetic appeal but also facilitates smoother transitions through blocks and genoa/jib car leads. The key is to ensure that the taper is uniform and that the core remains securely housed within the cover, providing a seamless finish.
-
Bury the Core Tail: Milk the cover over the tapered tail until it disappears into the rope.
-
Bury the Excess Core at the Loop: Hold the rope at the slipknot and firmly milk the cover toward the splice with the other hand. The cover will slide over Mark 3, Mark 2, and the crossover Mark T up to Point R (figure 10). While it sounds easy – this is the most challenging part of this splice – so you may need to stop and smooth out the eye to prevent the tail from catching at the throat of the splice. If bunching occurs at the crossover, grasp the crossover at Mark T and firmly smooth cover slack toward Mark X, applying a spike technique – repeating until any bunching disappears. Remove the tape from the crossover and continue milking the entire strand until Point R meets Mark X.
-
Complete the Splice: To complete the eye splice, and to prevent no-load opening of the splice, we highly recommend you lock stitch the eye – see below for directions.

Tips for the Final Bury
- Anchoring the slipknot around a stationary object will help by allowing you to use BOTH hands and the weight of your body to more easily bury the cover over the core and crossover.
- By securing the slipknot, the added tension will also help reduce the diameter of the core and crossover for easier burying.
- While holding the crossover tightly, milk any excess cover from Point R to Mark X. Flex and loosen the rope at the crossover point during the final bury. If it's extremely tight, hammering the cover at Mark X will help loosen the strands.
Lock Stitching
It only takes a few minutes, and we HIGHLY recommend you lock stitch your eye splice, so here's how:
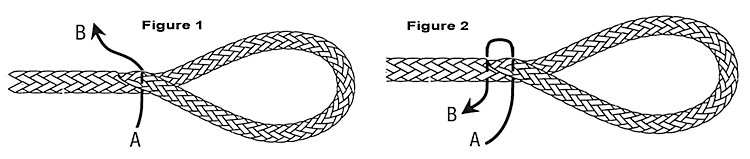
- Thread some twine on a sailing needle and pass it through the spliced area near the throat of your eye as shown – leaving enough behind to knot and bury later (figure 1).
-
Reinsert the twine through the rope, covering 2 strands from the exit point. Pull the twine snug, but not tight (figure 2).
- Continue as shown until you have at least 3 complete stitches on each side of the rope (figure 3).
-
Rotate the rope 90° and reinsert the twine into the spliced area in the same fashion, working back towards where you began. The splice will now be stitched on two planes that are perpendicular to each other. Keep the twine snug, but not too tight.
- When you reach the starting point (after at least 3 complete stitches), extract both ends of the twine together through the same opening in the braid. Tie them together with a square knot (figure 4) and reinsert the knot between the cover and the core, than bury the ends into the braid.

Eye splice in ropes made from super fibres such as Dyneema®
Creating an eye splice in ropes made from super fibers, such as Dyneema®, requires attention to detail due to the unique properties of these materials. Dyneema® offers exceptional strength-to-weight ratios, but it can be slippery, making it essential to ensure that the splice is executed correctly for optimal performance. The core carries the majority—or all—of the load. The cover is primarily for abrasion resistance and handling, not strength. Splicing relies on specialized tuck-and-bury methods, increased bury lengths, and often additional lock stitching to prevent slippage due to slipperiness and Class II low stretch of high-tech fibers. Splicing Class II ropes requires precise adherence to the manufacturer's instructions since mistakes can cause the splice to fail. We are not covering those splicing techniques in this article.
Quick Recommendations
When it comes to selecting the best ropes for splicing:
| Category | Rope | Description |
|---|---|---|
| Best Overall Rope | Samson XLS Yacht Braid | Exceptional flexibility and handling, designed for easy splicing by hand or with tools. |
| Best Budget Choice | New England Ropes Sta-Set | A favorite among boaters, provides excellent value and is known for being forgiving for beginners. |
| Best Premium/Performance | Dyneema-Braid (e.g., Marlow D2 Racing) | Incredible tensile strength and low stretch, but requires experience and sometimes specialized splicing techniques beyond the scope of this article. |
Tips for adding a thimble or shackle to your eye splice
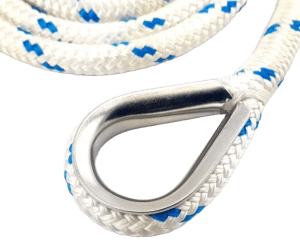
Unless you are using a soft shackle, it is usually not recommended to add a metal shackle to your eye splice without using a thimble. The reason is that the rope will point load on the bail of the shackle, and the line will eventually break.
When adding a thimble to your splice, it's essential to follow specific guidelines to ensure a secure and effective splice. Start by measuring the desired eye size using the diameter of the thimble as a reference point. Once you have established the size, proceed to form the eye and carefully insert the thimble into it. This adjustment allows the thimble to support the rope and reduce chafing during use. Remember to keep the splice tight but not overly so, as this could compromise the rope's structural integrity. Next, follow the splicing steps described earlier in this article.
Whippings
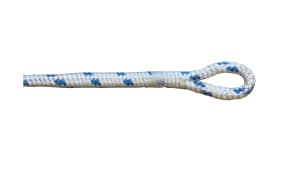
The key to effective whippings is to keep the tension consistent while wrapping, as this will ensure that the strands hold together without slipping. Depending on the size and type of rope you are working with, you may need to adjust your technique to ensure a snug fit. Properly executed whippings not only finish off your splice neatly but also contribute to the overall longevity of your rope.
Frequently Asked Questions
What is a double braid eye splice used for on a sailboat?
A double braid eye splice creates a permanent, fixed loop at the end of a rope for applications such as sailboat halyards, dock lines cut to a specific length, and anchor rode terminations. It can also seat a rope thimble to protect the line where it contacts a metal shackle or wire rope.
How strong is a double braid eye splice compared to tying a knot?
A correctly executed double braid eye splice retains 90 to 95 percent of the rope's original breaking strength. A standard knot, such as a bowline, typically reduces line strength by 30 to 50 percent, making a splice the superior terminal for load-bearing applications on sailboat rigging.
What is the difference between Class I and Class II double braid rope for splicing?
Class I double braid rope, made from polyester, nylon, or olefin, shares the load equally between its braided core and braided cover and is spliced using standard crossover techniques. Class II rope uses high-performance fibers like Dyneema where the core carries nearly all the load, requiring specialized manufacturer-specific splicing methods.
Do I need a fid to complete a double braid eye splice, or can I improvise?
A tubular or wire splicing fid is strongly recommended for routing the cover through the core cleanly. In a pinch, a taped pencil, stiff wire, or blunt knitting needle can substitute, but expect slower progress and a less tidy crossover transition that may be harder to bury smoothly.
Why do I need a rope thimble when attaching a metal shackle to an eye splice?
Without a stainless steel rope thimble, the eye loop contacts the shackle bail at a single point, creating a point-load concentration that gradually cuts through the rope fibers. A correctly fitted thimble distributes that load across the full curve of the eye, preventing premature line failure.
What is lock stitching in a double braid eye splice and why is it recommended?
Lock stitching uses a sailmaker's needle and whipping twine to sew through the spliced throat on two perpendicular planes, completing at least three full stitches per side before tying a square knot and burying the ends. This prevents the buried crossover from opening when the line goes slack or under zero-load conditions.
What is whipping and how does it differ from lock stitching on a splice?
Whipping wraps a tight, continuous layer of durable twine around the outside of the rope at the throat of the splice to prevent cover fraying and reinforce the finished end. Lock stitching passes the needle through the rope body on two planes. Both techniques can be combined for maximum splice longevity on working halyards and dock lines.
Which polyester double braid rope is best for learning how to splice?
Samson XLS Yacht Braid is widely recommended as the best overall choice for learning because of its consistent strand construction and forgiving handling. New England Ropes Sta-Set is a strong budget alternative known for being beginner-friendly. Both are Class I polyester double braid lines well-suited to standard eye splice techniques.
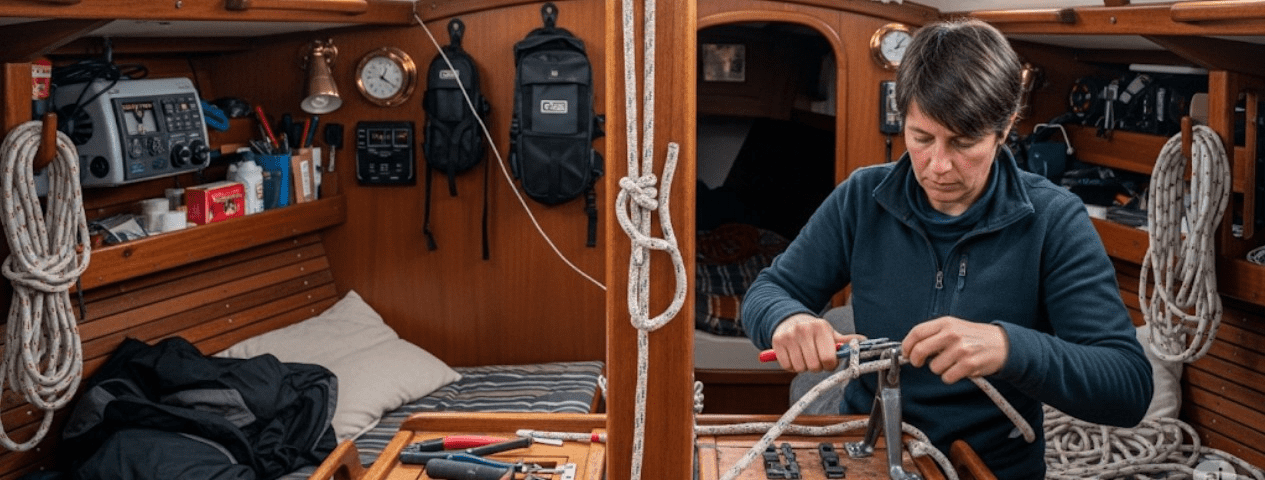
This completes the lesson on how to splice an eye when using Class I line. Fisheries Supply carries a wide variety of Class I lines perfect for use with this splice, as well as all the splicing tools you need. We hope you've enjoyed this guide, but if you have any questions – please don't hesitate to contact our splicing experts at (800) 426-6930.