Marine Varnish Tips and Tricks

Essential Marine Varnish Tips for a Flawless, Long-Lasting Brightwork Finish
- Preparation is Paramount: A flawless marine varnish job relies heavily on meticulous stripping and surface preparation; any minor imperfection left during prep will be amplified by subsequent coats.
- Weather is Critical: The optimal temperature range for varnish application is between 70°F and 85°F with low humidity. Temperatures below 65°F delay drying for days, while temperatures above 85°F cause fast evaporation leading to brush marks and bubbles.
- Seal the Wood First: The initial coat acts as a sealant and should be strained and thinned up to 50% according to manufacturer guidelines to properly penetrate porous wood grains.
- Apply Thin, Even Coats: Avoid thick applications which slide, drip, bubble, and dry unevenly. A standard protective or mirror-like finish requires building up slowly across 5 to 10 thin coats.
- Sanding and Cleanliness: Lightly sand between dry coats using 320-grit sandpaper or green Scotch-Brite pads. Ensure the varnish is completely dry (it should sand off as a fine powder, not clog the paper), then thoroughly vacuum and wipe down with denatured alcohol and a tack cloth immediately before the next coat.
- Rolling and Tipping Technique: For large flat surfaces like tables, use a small foam roller to spread the varnish quickly and evenly, then immediately follow behind with a dry bristle brush moving with the grain to smooth out air bubbles.
- Prioritize Safety: Always wear gloves and a protective mask during application to safeguard skin and lungs from toxic chemicals and heavy varnish fumes.
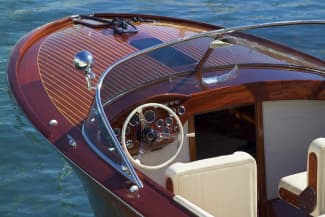
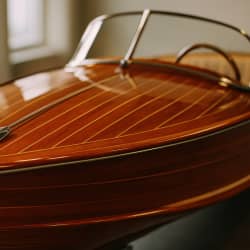
Everyone loves the look of perfect brightwork on a boat – that beautiful high gloss finish with the warm glow of the teak shining through. But if you've ever owned a boat, you also know the pain of watching that varnish peel off or break down under the harsh effects of the marine environment. Following, we discuss marine varnish application tips for DIY boaters - specifically a step-by-step guide to varnishing boat teak, along with answers to popular questions and tips to help keep your varnish looking its very best.
What is marine varnish and how is it different from regular varnish?
Marine varnish is a specialized coating designed for boats and other marine applications. Unlike regular varnish, it contains UV filters and is formulated to resist moisture, salt, and harsh weather conditions. This durability ensures long-lasting protection for wood surfaces exposed to the elements in marine environments.
If you haven't done much varnishing, it helps to conceptualize the process as occurring in three phases:
- Stripping – removing previous varnish, paint, or other coatings
- Preparation – sanding and cleaning the surface to be varnished
- Finishing – applying the varnish
A good marine varnish job greatly depends on the preparation, so plan on spending the majority of your time in the stripping and preparation phases. Every imperfection in your prep job will be amplified by the subsequent coats of varnish – so take your time getting everything right before you start.
Stripping Off the Old Marine Varnish for Teak Wood
Products You'll Need During Stripping:
| Heat Gun | Chemical Stripper |
|---|---|
| Scrapers | Solvent Resistant Masking Tape |
| Lacquer Thinner | Disposable Paint Brushes (application of chemicals) |
| Gloves | Nylon Scrub Brushes (for removal of stripper) |
| Safety Glasses | Chemical Respirator (if using chemicals) |
Stripping the wood can be done in a variety of ways. If the current varnish is in pretty bad shape, it's probably best to take all of it off and start from scratch with bare wood. One approach is to use a chemical stripper which you paint on to dissolve the existing varnish. Another approach is to use a heat gun and a scraper, gently scraping away the varnish, while being very careful to not dig into the wood below. The third option is to just sand away all of the old varnish until you have a nice smooth finish. Each method has its own benefits, so you'll have to experiment to decide what works best for you.
Once you've stripped the varnish, if you have badly stained teak, it can be a good idea to use a specific teak cleaning and/or bleaching product such as Teka or Teak Wonder.
How to Prepare Teak for Varnishing
Products You'll Need During Preparation:
| Various Grits Sandpaper | Various Grits Sanding Sponges |
|---|---|
| Scotchbrite Pads - Green | Safe Release Masking Tape |
| Dust Mask | Denatured Alcohol |
| Cotton Rags | Tack Cloths |
Once you've removed the prior coats of varnish, it's time for the preparation phase. This is where you want to get your wood perfectly sanded so it's a smooth good finish. This can take a very long time, but your patience here will pay off. First, tape off all the areas you are going to sand so that you don't damage any surrounding surfaces as you sand. Next, start with lower grit sandpaper (as coarse as you need to remove any dings or scratches), and slowly work your wary up to 220 grit for proper smoothness. Finish with 320 grit, or a green Scotch-Brite pad for that silky texture if you're after a mirror-like finish.
Once everything has been properly sanded, it's imperative that you remove all the sanding dust. First, remove any tape you've used for masking (dust loves to stick to tape!), then vacuum all surfaces thoroughly. Follow by wiping down the surface with denatured alcohol and a white cotton rag, making sure to change out your rag as it gets clogged with dust. Wipe every surface to be varnished until you are no longer seeing any dust collect on your rag. Finally, wipe each surface one more time with a tack cloth – a slightly sticky cloth that picks up the last of the dust and dirt. Do this immediately before you start varnishing - not the night before. If more than 30 minutes has elapsed since you used the tack cloth - do it again right before applying the first coat of varnish.
Application of Marine Varnish
Products You'll Need During Finishing:
| Varnish | Companion Thinners/Reducers |
|---|---|
| Latex Gloves | Safe Release Masking Tapes |
| Containers and Lids | Paint Strainers |
| Tack Cloths | Foam Brushes - Assorted Sizes |
| Cotton Rags | Bristle Brushes - Assorted Sizes |
| Knee Pads | Single Edged Razor Blades |
One of the most important factors when varnishing is the weather. Make sure you pick a day that will be warm, dry and not overly hot. The best temperature for varnish application is between 70° to 85°F, without too much humidity. If it's under 65°F, your varnish could take days to dry. If it's over 85°, you risk the that the solvents in the varnish will evaporate too quickly, which makes it set up too fast, causing brush marks and bubbles. If you absolutely have to work in higher temperatures, thin the varnish (up to 25%) and work in smaller sections. If it's too humid – you're varnish may fog before drying – not pretty! Choose your weather wisely or all that preparation will be for nothing and you'll be back to square one.
Tape everything off once more to protect the areas around your wood. While it may seem crazy to mask all the areas twice, you would be amazed at how much dust tape can hide - so if you are looking for glossy perfection, do a fresh masking of all surfaces. For your first coat, which will act as a sealant, strain the varnish into your container and then add the recommended thinner (read the can) by up to 50%. Since this is sealing the wood, you want to ensure that the varnish gets into every nook and cranny - which is why you want a thin coat. Apply your first coat by quickly painting across the grain with a small amount of varnish, and then finish brushing WITH the grain of the wood. If your wood is highly porous, you may want to apply a second sealant coat. It's also very important to follow the manufacturer's recommendations on how to thin the varnish.
Make sure you let this coat (and every coat after it!) dry completely. We cannot stress the importance of this enough. It's very easy to screw up all that preparation by getting a little impatient and wanting to move on to the next coat - but trust us that patience and letting each coat dry fully will make a huge difference. When the first coat is completely dry, apply the next coats of varnish, building it up slowly and sanding lightly between coats as needed to keep your surface smooth, until you reach the number of coats you thinks you need. Again - do not try to sand before the varnish is completely dry! How can you tell? When sanding, the varnish should come off like a powder – if it's clogging up your sandpaper you've jumped the gun and need to wait longer. Once dry, sand off just enough to take away the shine and create a perfectly smooth surface – you should easily be able to see drips or where your varnish has become uneven and needs extra work. Make sure you do a full vacuum/alcohol and tack wipe after every sanding as dust is the enemy! 320 grit sandpaper and the green Scotch-Brite pads are your best tools here. Depending on the surface, you may need anywhere from 5 to 10 coats of varnish – it's really up to you and whether you're just protecting the wood, or are seeking that mirror-like gloss finish. Just remember - the more coats you have, the longer it will be before the job needs to be redone!
Most importantly – don't rush – a good varnish job is a labor of love. Take your time and enjoy the process!
Additional marine varnish application tips for DIY boaters:
-
For large surfaces, consider using a small foam roller to get faster, more even coverage – then follow with a bristle brush to lightly tip the varnish out, removing any bubbles created by the roller.
-
Do not apply varnish thickly! Use a light hand and spread a thin, even coat. Thick varnish tends to bubble and slide – creating drips and runs that you'll have to sand off later. Thick coats also take far longer to dry and often dry unevenly – creating much more work in the long run when you have to sand it off.
-
When loading your brush, load only the first ¼” or so and dab it against the side of the bucket to remove excess varnish. Then dab the varnish across the surface of your wood before spreading it out evenly. This helps you apply an even coat, instead of releasing all the varnish with the first stroke.
-
When opening your can of varnish, lightly mix it – feeling for sediment in the bottom. It's important not to mix too vigorously as that will introduce bubbles into the varnish. You should always strain your varnish before application – strainers are cheap and it's quick to do, so don't skip this step!
-
When tipping to remove air bubbles, move quickly across the surface. If the surface has already gone tacky, it's too late to tip – work in smaller areas to make sure you can finish tipping before the varnish has dried too much.
-
When you remove your tape at the end, you will likely have some spots where the varnish has overrun the tape onto the fiberglass. Simply use a razor blade to carefully scrape it off – running level with the surface – don't dig in!
-
Wear gloves and a mask! It's much easier to take off a glove than to try to get varnish off your skin with toxic chemicals - and varnish fumes are also not healthy, so protect your lungs.
-
Varnish experts will argue forever on what is the best brush to use – but for beginners it's usually best to start with a foam brush – and switch them out when they get too saturated. Buy a handful of each size – they're cheap!
What are the different types of varnish?
Marine varnishes are designed to withstand harsh environments, including sunlight, saltwater, humidity, and temperature swings. Typically "gloss" versions are used on exteriors and have higher UV protection, while "satin" versions are used on interiors and have a softer look. Here are the main types of marine varnish, along with their features and ideal uses:
| Traditional Spar Varnish | Polyurethane Varnish | Two-Part Varnish | Water-Based Varnish | |
|---|---|---|---|---|
| Base | Long-oil Alkyd | Oil-modified or water-based polyurethane | Two-component (resin + hardener) | Acrylic or polyurethane dispersion in water |
| Finish | Glossy with a warm, amber tone. | Glossy to satin. | Ultra-glossy, hard finish. | Clear (non-yellowing), satin to gloss. |
| Pros | Flexible and high UV resistance. | Very hard, durable and excellent UV protection. Dries faster and needs fewer coats. | Extremely durable, UV-stable and long-lasting. | Low odor, fast drying and easier cleanup (soap and water). |
| Cons | Requires many coats and regular maintenance. | Less flexible, so may be prone to cracking. | Requires precise mixing and faster application and is less forgiving to apply. | Less traditional appearance and not as durable. |
| Best For | Classic wood boats, wood masts and spars. | Cockpit tables, railings with light flexing. | High-performance or professional-grade applications, super yachts, exterior trim. | Interior woodwork |
| Popular Brands | Epifanes Clear Varnish, Pettit Captains Varnish, Interlux Schooner, McCloskey Man O'War Varnish | Awlwood MA by Awlgrip | Awlgrip Awlwood MA, Epifanes PP Varnish Extra | Interlux Goldspar Water-Based |
Frequently Asked Questions
What is the difference between marine varnish and regular wood varnish?
Marine varnish contains specialized ultraviolet filters and a higher ratio of oil to resin compared to regular varnish. This specific formulation provides the essential flexibility and moisture resistance required to protect exterior boat brightwork from saltwater damage, wood expansion, and harsh solar degradation in marine environments.
What are the ideal weather conditions for applying marine varnish to boat teak?
The optimal temperature range for applying marine varnish is between 70°F and 85°F with low ambient humidity. Applying coatings below 65°F delays curing for multiple days, while temperatures exceeding 85°F cause rapid solvent evaporation, resulting in unwanted brush marks, blistering, and surface bubbling.
How do you perform the rolling and tipping technique on a wood boat table?
The rolling and tipping technique involves applying marine varnish rapidly over a large surface area using a small foam roller. The varnisher then immediately follows behind with a dry, high-quality bristle brush, gliding lightly with the wood grain to smooth out surface imperfections and eliminate air bubbles left by the roller.
How should a boater prepare the first coat of marine varnish as a wood sealer?
The initial coat acts as a deep-penetrating wood sealant and must be strained to remove debris, then thinned up to 50% using manufacturer-recommended companion thinners or reducers. This low-viscosity mixture ensures maximum penetration into the porous grain of bare teak before building full-strength topcoats.
How can a DIY boater tell if marine varnish is dry enough to sand between coats?
Marine varnish is sufficiently dry for inter-coat abrading when sanding the surface with 320-grit sandpaper or a green Scotch-Brite pad produces a fine, dry white powder. If the coating balls up or clogs the abrasive material, the solvents have not fully evaporated, requiring additional drying time.
What are the differences between traditional spar varnish and polyurethane marine coatings?
Traditional spar varnish utilizes a long-oil alkyd base that remains highly flexible to prevent cracking on moving parts like wood masts and spars. Polyurethane varnishes, such as Awlwood MA, cure into an exceptionally hard, scratch-resistant finish best suited for cockpit tables and heavily trafficked companionway railings.
What steps are required to eliminate dust immediately before applying marine coatings?
First, vacuum the sanded wood surface thoroughly, then wipe the bare teak down using denatured alcohol on a clean white cotton rag to pull up residual contaminants. Finally, wipe the area immediately before application with a sticky tack cloth to trap microscopic airborne particles that ruin high-gloss finishes.

We hope you've enjoyed this guide to varnishing – but if you have any further questions, please don't hesitate to contact our paint experts at (800) 426-6930.